* ACCURATE TO .01 MINUTE PER DAY
* LOW POWER LIQUID CRYSTAL DISPLAY
* BATTERY OR CAR POWERED
* ALL SWITCHES "BUMP" PROOF
* OPERATES FROM -20 TO +130 F
* SIZE 3"H X 4"W X 2.5" D
* COUNTS TO 59.93 MINUTES THEN ZEROS TO BEGIN NEXT HOUR
* ALL SOLID STATE
* 1 YEAR GUARANTEE (except for battery)
OPERATION:
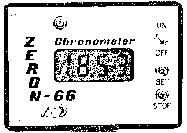
The ON/OFF switch controls the 66's power. To prevent an accidental
bump from turning off the unit , the switch lever must be pulled out whenever you want to change it's setting. When the 66 is turned on, the display zeros and begins counting at 00.00 minutes. To zero after the clock is running, switch off, then on.
The time split is activated by throwing the lower left switch to (check). This will hold the time displayed while the 66 continues to count internally. When the control is switched off, the display updates to real time of day.
The small red button in the upper left is a safety switch which must be pushed at the same time as either SET or STOP. Unless this button is pressed, the the other two have no effect. This is another precaution against the unintentional bump. The STOP button holds the clock at its present reading. The SET circuit adds time to the minutes digit at 100 counts per minute.
The 66 is set to time of day in two steps. Just before and even minute on your time reference (WWV, CHU or correct watch), press the safety and STOP and then switch on the 66. Disregard the time shown in the display. Internally the 66 is set to 00.00 and is holding there. When an even minute arrives, release the buttons. Exactly .01 minute later, the clock will begin counting at 00.01. The hundredths part of your 66 is now set.
For step two, push the safety and SET to run the minutes up to the correct time. That's all there is to it. With a little practice, you will be able to set the 66 in about 30 seconds.
INSTALLATION:
The 66 can be powered from either a a self-contained 9 volt battery or the car's electrical system. A heavy duty battery is already installed in the unit. The battery is the standard variety used in portable radios and handheld electronic calculators. To remove or replace the battery, back out the four screws in the front panel and pull the 66 from its case. Avoid touching the printed circuit boards or their components. Some parts could be damaged if subjected to static electricity. Carefully re-route the battery holder's electrical cable when reassembling.
A prewired power cord is included for running the 66 from your car's 12 volt system. Connect The red lead to +12 volts (un-interrupted by the ignition switch), the black lead to ground. Attach The leads as securely as you can make them. A power loss, either +12 volt or ground, will erase the time in the 66. Don't select a power source from under the dash. It may contain many slip-on connectors as it is routed from point to point. Pick a lead close to the fuse holder. Since the center connector on the power cord might accidentally short to the car's chassis when it is not plugged into the 66, be sure that you use a wire which runs thru a fuse. One that runs the interior lights would be a good choice. If there are no screw-on terminals in the fuse holder, strip back the insulation from a lead, make your connection, solder, then wrap with electrical tape for a secure joint. Attach the ground lead under a screw mounted in a metal part of the car's chassis. Scrape away any paint which might cause a poor current path. Using a loose fitting cigarette lighter plug is inviting disaster.
Small holes can he drilled in the case for use in mounting the 66 to the dash or a clipboard. Be sure that your hardware does not contact any internal circuitry. The case may crack if you over tighten it. Gluing a atrip of Velcro buttonless fastener to the case makes a convenient method for attaching your 66. Velcro can be purchased wherever sewing sundries are sold.
Try not to mount the 66 on the dash in such a way that it might be left in direct sunlight when the car is parked. If the dash temperature exceeds 120 F, the display will darken and become. very hard to read. At extremely low temperatures, the display will exhibit a sluggishness as it changes from number to number. Neither condition will harm the 66,
ACCURACY:
When run from the car, the 66 will stay within .01 minute over 24 hours when the ambient temperature range is 50-100 F. Operation at the temperature extremes will result in no worse than .02 minute error in 24 hours. Accuracy during battery operation depends on the battery's condition. With a new one (about 9.5 volts), the 66 will run about .01 minute fast in 5 hours. As the battery approaches mid-life (around 8 volts), the accuracy will improve. Once past this point, The 66 will begin running slow. When the battery reaches 7 volts, The unit will be running .01 slow in 5 hours. Your 66 has a low battery indicator to warn you when the battery has reached approximately 7 volts. Two dots will appear over the display's decimal point.
A new battery should last about a year if used twice a month for 8 hours. With continuous use, about 4-5 days would be typical. When the low battery indicator appears, the 66 will continue running for another 20-30 hours although at reduced accuracy.
You may connect The 66 to 12 volts even though the battery is in place. However, the battery will continue to run the unit until its voltage falls below 8 volts. At this point the car's system will take over. As you can see, this will needlessly run down a good battery. Remove it when you use the car's power.